
|
| Home Download Screenshot Quick Start Documentation History |
Designing Oxetta Reports
Creating a blank report with Oxetta
To start designing Oxetta reports, please launch the Oxetta Report Designer - the OXETTA.EXE application included into the program's installation package. After the program will start, you will see it's main window ready for creating a new report:
![]()
We will design a report that will retrieve information from the database. We will show you how to design the "Employee List" report that will list employee getting them from the SQLite database included into Oxetta installation. To set up a report to retrieve information from that database, please set the "Database Type" report property to "SQLite" and "Database Connection String" to "database.sqlite" file name since this file is included into Oxetta installation:

When designing reports of your own, you will most likelly set the "Report Type" property to ODBC, and the "Database Connection String" property to the corresponding ODBC connection string, e.g. "DSN=myODBCconnectionName" in most cases.
Report Bands
To start designing a report, please click the Page Header, Report Header or Contents item in the left part of the main window and then click the central part of the window. This will create a new band of the selected type and add it to the report:

Now we need to explain you the idea of the report bands. Suppose you need to print the list of employee of your company, organized into departments:

This report consists of the three different parts:
- The report header part (the "Employee list" string)
- The group header part (the name of the department and the heading table for the employee)
- The contents part (employee names)
The report header part is printed only once, the group header part is printed many times (the number of departments in the company), and the contents part is also printed many times in the report (the number of employee in the company). For better understanding we have marked these parts with different colors:

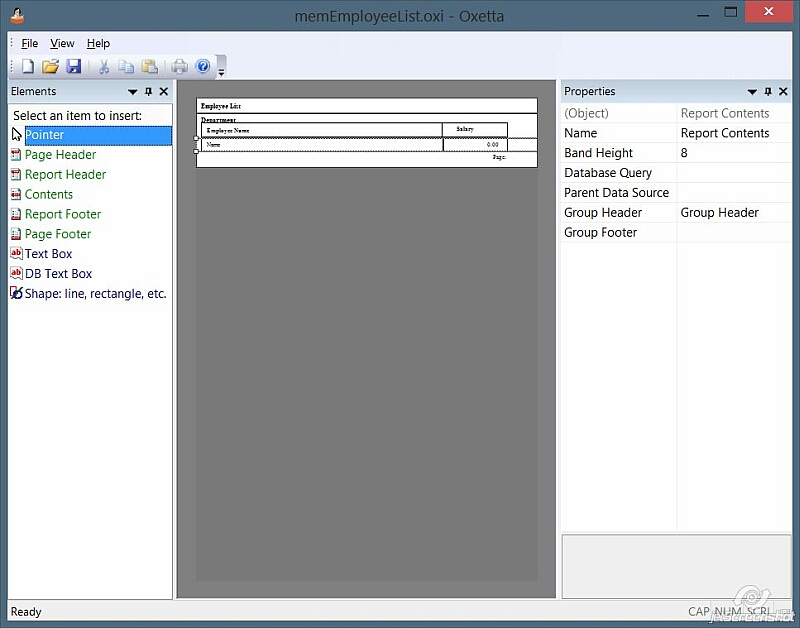
Each part of the three listed above should be implemented in Oxetta as a report band. To design this report with Oxetta, you need to add three bands to the report: the report header band, the contents band (it will work as a group header and contain department names) and one more contents band (the report contents with employee names).
Please click "Report Header" in the left part of the designer application window, then click the main part of the window to add that band to the report, then click "Contents", the main part again, "Contents" again and the main part again. In the result, you will have three bands in the central part of the Oxetta window:
![]()
Designing Report Header Band
Now we will design the report header band. Please click the "Text Box" element in the left part of the main Oxetta window and then click the report header band you've added to the report to add a new text box. After the new text box will appear on the report header band, please switch to the Properties window in the right part of Oxetta window and specify the "Employee List" string for the "Text" property:

Please add one more text field in the right part of the report header band, change the name of the text field to "Report Date" and the text to "Report date: 01/01/2016".

Designing Group Header Band
Now you design the group header band that will contain not only the name of the department, but also the heading table for the employee list. First of all, please click the group header band and specify the database query used to retrieve report data from the database. To do so, please select the "Database Query" property of this band and specify the following query: SELECT id AS department_id, name FROM departments.
Now you draw the band contents. Please put a new "DB Text Box" element to the band and specify the following properties for that element:
- Data Source: Please select the name of the group header band you are working with. Most likelly it will be the "Report Contents 1" band
- Data Field: Type the name word in this field as it will display the contents of the "name" column of the departments query (see above)
Now it is time to draw the table that will represent the header of the department's employee list. Please click the "Shape" item in the left part of Oxetta main window, then click the group header band we are working with now, and you will see the small rectangle you've placed on the band:

Using drag-n-drop, please move that rectangle to the left-bottom part of the band and increase it's size to make it as large as the box surrounding the header of the "Employee name" column of the future report

Now put another shape on the band and move it to the position that will make it surround a header of the "Salary" column of the employee list report:

And now put two "Text box" elements with "Employee Name" and "Salary Value" texts into the created rectangles so the group header band will be finished:

Designing Report Contents Band
The group header band design is finished now, let us proceed to the details band. Please select the third report band with mouse and fill in the following band properties:
- Database Query: SELECT first_name || ' ' || last_name AS name, salary FROM employee WHERE department_id=:department_id
- Parent Data Source: Select the group header band here
- Group Header: Select the group header band here

Now we will design the report details band. Please put two rectangular shapes on it, the first for the employee name and the other one for the employee salary, and put two DB Text Box elements. For these DB Text Box elements please specify:
- Data Source: Select the report contents band here
- Data Field: the name string for the first DB Text Box element and the salary string for the second one
- Data Format: %.2f for the second DB Text Box element

On this stage the report design is completed. You now need to launch it from your C++ application.
Adding Oxetta Files To Your C/C++ Project
To print the report you've just created from your application with Oxetta you will need to add two files to your C/C++ project:
- OXETTA.DLL - The Oxetta reporting engine itself
- OXETTA.H - The C/C++ header file which contains all necessary function prototypes
To add Oxetta to your project, please copy the OXETTA.H file into your project folder. After that, create a new function that will launch Oxetta to print of print preview a report, and add the #include "OXETTA.H" directive to the beginning of the source file.
Writing C++ Code To Launch The Report Created
You need your application to provide certain information (reporting date in the example above) to Oxetta when printing the report. To do so, please develop a callback function Oxetta will call to get that information from your application:

After that, create a function that will load the OXETTA.DLL file using the LoadLibrary WinAPI function, receive a pointer to the oxiPrint or oxiPreview function from the loaded library by using the GetProcAddress WinAPI function, and launch that function, providing it with the designed report file name and a pointer to the callback function created above:

Compile the application and copy the following files to the program's Debug or Release folder:
- OXETTA.DLL: reporting engine file
- dbEmployeeList.oxi: the report you created using instructions above
- database.sqlite: the sample database file you'll find in the Samples folder of Oxetta download package
Please now launch the application you've compiled, forcing Oxetta to build the report, and you will get the designed report in the Print Preview window:

Next article: Report Object Properties
Oxetta documentation: Documentation Index
| Copyright © Oxetta, 2016 |